
This is the first in a series of posts about creating reusable Azure DevOps YAML pipelines across many projects. In these posts, I’ll start with simple CI/CD pipelines and progress to a complex, dynamic pipeline.
- CI/CD YAML Pipelines (this post)
- Creating a Build Pipeline Template
- Creating a Deploy Pipeline Template
- Adding “feature flags” to a pipeline
- Dynamic CI/CD Pipeline
- Azure DevOps Pipeline Tips and Tricks
💁 I assume you are familiar with the basic application lifecycle concepts for containerized applications. I tried to make this as generic as possible so you can adapt it to your project.
The YAML, sample source code, and pipelines are all in this AzDO Project.
The Problem
I have a containerized application that works fine locally. Now I want to create a CI/CD pipeline to build and deploy it using Azure DevOps (AzDO) YAML pipelines.
The Solution
In this post, I’ll walk through creating typical build and deploy pipelines using AzDO YAML pipelines. This example is a simplified, generic version of pipelines I’ve used for a few years. Since the application is containerized, it can be any tech stack from .NET Core to Node.js to Python. Only the Dockerfile would be different. The deployment is stubbed out in the examples, but you can deploy the image to Kubernetes via Helm, cloud services, etc.
I create separate build and deploy pipelines. It’s possible to use one pipeline, but I have learned from painful experience that it’s better to separate them. The main reason is to be able to manually run the deploy to deploy to a custom environment list, fix a failed one, or roll it back using a previous pipeline. Also, when it’s 3am and you’re doing a deploy to production only to discover a bug in your deploy YAML, you do not want to run a build and deploy pipeline just for a deploy fix.
Folder Structure
I like to keep the build- and deploy-related files in a DevOps folder in the root of the repository. If I have multiple deployables, I’ll create a subfolder for each one under DevOps. Here’s the folder structure for this example.
├── DevOps
│   ├── build.yml          # The AzDO build pipeline
│   ├── deploy.yml         # The AzDO deploy pipeline
│   ├── Dockerfile         # The Dockerfile to build
│   ├── values.yaml        # Helm values file
│   └── variables
│       ├── blue.yml       # Variables for the blue environment
│       ├── green.yml      # Variables for the green environment
│       └── red.yml        # Variables for the red environment
├── README.md
├── run.ps1                # A helper to build, run, etc, locally.
└── src                    # Context folder for the Docker build
    ├── sample-api.sln
    ├── sample-api           # Source for the sample-api .NET Core app
    ├── test
    │   └── unit           # Unit tests for the sample-api
    └── .dockerignore      # This must be in the Docker context folder
All my projects have a run.ps1 file with many CLI snippets to build, run, test, build docker, etc. locally. Instead of cutting and pasting command line snippets, they’re all in this file and you pass in a list of tasks to run like ./run.ps1 build,run. Here’s a typical one. I use run.ps1 on Mac and Linux, too!
💁 Brief Lesson on Pipelines
The structure of a pipeline is shown below. (MS AzDO Concepts) By default,
stagesrun sequentially, andjobsrun in parallel, but you can change that viadepends. If your pipeline only has jobs, you can omit thestagessection. If it only hassteps, you can omit thestagesandjobssections. I usevariablesin the pipelines, which can be defined at the pipeline,stage, orjobscope, and the last one wins.variables: ... stages: - stage: variables: ... jobs: - job: variables: ... steps: - script: echo "Hello, world!" - task: TaskName@1
The Build Pipeline
The build pipeline gets the source code, builds the Docker image, and pushes it to the container registry (if not a dry run). The build and unit tests are run in a multi-stage Dockerfile. See my post on unit tests in Docker.
Preamble
The first part of the pipeline is shown below, with explanations following. This sets up the pipeline before we start doing anything.
name: '1.1.$(Rev:r)$(buildSuffix)'

parameters:
  - name: isDryRun
    type: boolean
    displayName: Perform a dry run - do not push the docker image
    default: false

trigger:
  branches:
    include:
      - refs/heads/main
      - refs/heads/develop
      - refs/heads/release/*
  paths:
    exclude:
      - 'DevOps'
      - 'doc'
      - '*.md'
      - '*.ps*1'

pr:
  branches:
    include:
      - refs/heads/main
      - refs/heads/develop
  paths:
    exclude:
      - 'DevOps'
      - 'doc'
      - '*.md'
      - '*.ps*1'

variables:
  - name: tags
    ${{ if eq(variables['Build.SourceBranchName'],'main') }}:
      value: "$(Build.BuildId)"
    ${{ else }}:
      value: "$(Build.BuildId)-prerelease"

  - name: buildSuffix
    ${{ if parameters.isDryRun }}:
      value: '-DRYRUN'
    ${{ else }}:
      value: ''
💁 Brief Lesson on Variable Syntax
In the code above I use two of the three syntax types. The
template expression syntax(akatemplate syntax), which is${{ ... }}, and the macro syntax, which is$(...).The
template syntaxis evaluated when the YAML is processed at compile-time, similar to pre-processor directives in a language like C++ (#ifdef, #define, etc.). When you view expanded YAML in the AzDO UI, you will never see the template syntax. For thebuildSuffixvariable above, if theisDryRunparameter is true, the resulting YAML will be:- name: buildSuffix value: '-DRYRUN'The
macrosyntax is evaluated at runtime. Variables in macro syntax may not be known at compile-time. When you view expanded YAML, it will have$(myName)in it since it’s not until the step is executed that it is replaced with the actual value. If the variablemynamedoesn’t exist at runtime then$(myName)will left in the YAML, which may be what you want if it’s an inline shell script in a task. For thetagsvariable above, if we’re not on themainbranch the resulting YAML will be:- name: tags value: "$(Build.BuildId)-prerelease"The macro syntax remains in the YAML after it is compiled and at runtime $(Build.BuildId) will be replaced with the actual build number, e.g.
1234-prerelease.
name will be shown in the AzDO UI when the pipeline is run, and is available as a variable (Build.BuildNumber) in the pipeline that you can use to tag your image, etc. In this example, I have a hard-coded 1.1. that will be followed by the unique build number, $(Build.BuildId). The $(BuildSuffix) will be empty unless it is a dry run, in which case it will be -DRY RUN to make it obvious in the UI. The documentation shows all the various variables you can use in the name, such as parts of the date, etc.
parameters are values you can set when the pipeline is run manually. In the YAML above, a CI run will use the default value for isDryRun of ‘false’. A user can manually run the pipeline and set it to true to build without pushing the Docker image to the registry, which is handy to make sure a feature branch builds cleanly in AzDO. See the section below for how parameters are shown in the UI.
trigger and pr are configured identically. The trigger section tells AzDO when to run the pipeline when code is merged or committed to those branches. As the name suggests, pr is for pull requests.
In the code above, whenever a commit or merge happens for main, develop, or releases/* branches, the pipeline will run. If a PR is created for main or develop, the pipeline will run. Except for files listed in paths.exclude. In all cases those files will not trigger the pipeline.
If you have multiple deployables in the same repository, you can use paths.include to include only the source code for that deployable. Take time to get the paths right, as you don’t want to build and deploy every time someone updates the README or some other file that is not part of the build. If you want to test path paths.include and exclude, you can temporarily add your feature branch to the branches.include list so it is triggered by a commit.
In the preamble, I use several variables, such as $(Build.BuildId) and $(buildSuffix). The former is a predefined variable, of which there are many. The latter is one I set in the variables section using the {{if}} template syntax to conditionally set the value. Later blogs will make heavy use of this feature.
The Work
The build only has one job, so I omit stages. I could omit jobs and just have steps, but I like to give the job a displayName.
jobs:
  - job: build
    displayName: Build
    pool:
      vmImage: ubuntu-latest

    steps:
      - checkout: self
        displayName: 'Checkout source code'

      - task: Docker@2
        displayName: Build and test sample-api
        inputs:
          repository: sample-api
          command: build
          Dockerfile: DevOps/Dockerfile
          buildContext: ./src
          tags: $(tags)
          arguments: >-
            --build-arg BUILD_VERSION=$(Build.BuildNumber)
            --target build-test-output
            --output $(Agent.TempDirectory)/output

      - task: PublishPipelineArtifact@1
        displayName: 'Publish build log'
        inputs:
          targetPath: $(Agent.TempDirectory)/output/logs
          artifact: buildLog
        condition: succeededOrFailed()

      - task: PublishTestResults@2
        displayName: 'Publish Test Results'
        inputs:
          testResultsFormat: VSTest
          testResultsFiles: '**/*.trx'
          searchFolder: $(Agent.TempDirectory)/output/testResults
          publishRunAttachments: true
          failTaskOnFailedTests: true

      - task: PublishCodeCoverageResults@2
        displayName: 'Publish coverage reports'
        inputs:
          codeCoverageTool: 'cobertura'
          summaryFileLocation: $(Agent.TempDirectory)/output/testResults/coverage/coverage.cobertura.xml

      - task: Docker@2
        displayName: Publish sample-api
        inputs:
          repository: sample-api
          command: build
          Dockerfile: DevOps/Dockerfile
          buildContext: ./src
          tags: $(tags)
          arguments: --build-arg BUILD_VERSION=$(Build.BuildNumber)

      - ${{ if not(parameters.isDryRun) }}:
        - task: Docker@2
          displayName: Push sample-api Image to the ACR
          inputs:
            repository: sample-api
            command: push
            tags: $(tags)
job has an optional id, which is just build in this case. The id can be used to set up dependencies, or get output from one job into another (stay tuned for a later post).
pool is the agent pool (Virtual Machine type) this job will run on. All the steps in this job run on the same agent (VM) in sequence. Often a company will have its own agent pool of VMs with particular software installed, networks access, etc.
steps are where we finally start running tasks for our pipeline. Most steps you run are a task that performs some action, but there are some built-in ones such as checkout,bash, pwsh, etc. as described in the link. Regardless, each task will have the following properties:
displayNamewill be shown in the AzDO UI when it runs.inputsare the parameters for the task.conditioncontrols whether the task is run or not, and defaults tosucceeded(). That means the task will run only if the previous task succeeded. In the example above, I run the task that publishes the build output even if the build fails.
The displayNames above give a good idea of what each task is doing. You may wonder why is Docker@2 used three times. This is due to the way my multistage Dockerfile runs that allows me to get the build and unit test output from Docker (see this post). The first one does the build command to do a build and run unittest stages writing the output to $(Agent.TempDirectory)/output. The second one does the build to create the final image. The third one does the push command to push the image to the container registry.
💁 Adding Tasks to a New Pipeline
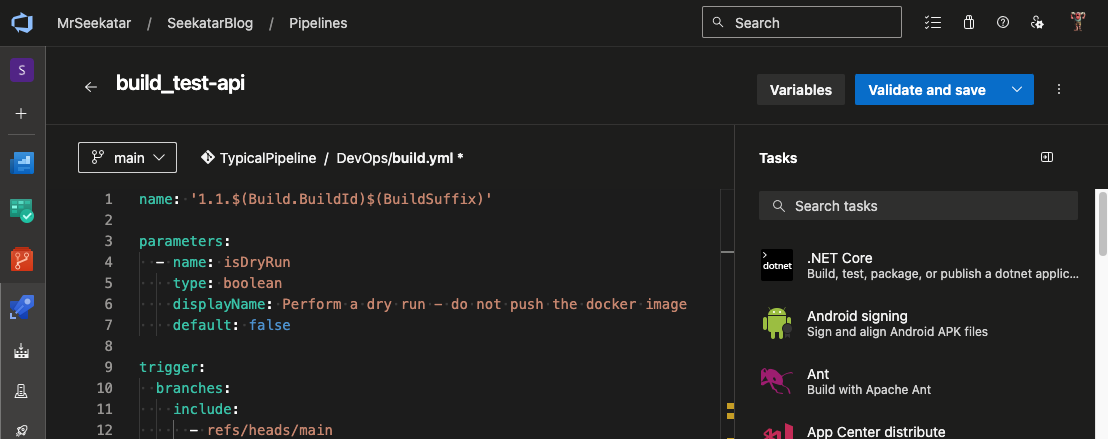
Finding task to build your first YAML, is a bit of a pain when editing YAML locally, even with the VS Code extension. If you edit a pipeline online in the AzDO UI, you can search for tasks your organization has installed, see their parameters, and add their YAML. You can save the pipeline online, or cut-and-paste to a local file. Be sure to click
Validatebefore saving it.Here’s a screenshot of the tasks in the AzDO UI with the Assistant on the right.
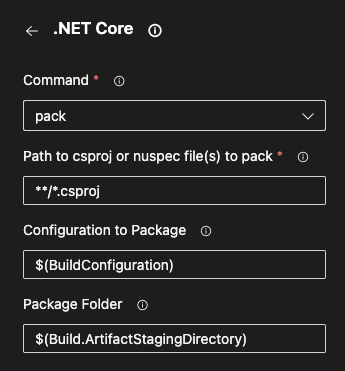
Here’s the list of parameters for the .NET Core pack command
Note that when you click
Addit adds the task’s YAML wherever the cursor currently is, not necessarily where you want it.
If this was building a library such as a .NET NuGet or npm package, it would use different build steps, and there would be no deploy pipeline.
The Deploy Pipeline
The deploy pipeline will get the Docker image from the container registry and deploy it. Most companies will have multiple environments, such as test, dev, staging, production, etc. I use the build-once-deploy-everywhere model. With only one build, you will have to set different configuration values for each environment. In this example I use a Helm values.yaml file, which is updated for each environment. You can use a separate values.yaml file for each environment, but that creates maintenance issues.
I use stages to deploy to red, green, and blue environments sequentially, which is the default. You can add depends to a stage to change the graph of the stages. To make things a bit interesting, each one has different values in their DevOps/variables/<env>-environment.yml file that are set in the values.yaml file.
Preamble
The preamble is similar to the build pipeline. The main difference is this is never triggered by a commit, instead it is triggered by the build pipeline, which is added in the resources section.
name: '1.1.$(Rev:r)-$(DeploySuffix)'

parameters:
- name: environments
  type: object
  displayName: Environments to deploy to
  default:
    - red
    - green
    - blue

- name: isDryRun
  displayName: Do a Dry Run
  type: boolean
  default: false

trigger: none
pr: none

variables:
  - name: deploySuffix
    # Set the build suffix to DRY RUN if it's a dry run, that is used in the name
    ${{ if parameters.isDryRun }}:
      value: '-DRYRUN'
    ${{ else }}:
      value: ''

resources:
  pipelines:
  - pipeline: build_pipeline  # a name for accessing the build pipeline, such as runID below
    source: build_sample-api    # MUST match the AzDO build pipeline name
    trigger:
      branches:
        include:
          - main              # Only trigger a deploy from the main branch build
parameters in this pipeline has an array of environments to deploy to by default. If run manually, the user can override the list and pick any environment. See the section below for how parameters are shown in the UI.
trigger and pr are disabled for the deploy pipeline since we never want to run it when code changes.
resources.pipelines.pipeline is how we trigger the deploy pipeline from the build pipeline. The source is the name you give the build pipeline when you create it in AzDO. In the trigger section I limit running the deploy pipeline only when a main branch build is run. With this configuration, whenever the build_sample-api pipeline successfully runs on the main branch, this pipeline will be triggered.
There are other types of resources, one of which I’ll cover in a later post.
The Work
Since the deployment YAML to each environment is identical, I use an ${{each}} loop to deploy to each one. For any differences between environments that can’t be handled by simply using the env variable, I include a separate YAML variables file for each environment.
There’s not much to the deployment, and this sample is stubbed out. In general, a Helm deploy will have the following steps:
- Get the secrets from the secret store to connect to K8s.
- Connect to the K8s cluster.
- Replace the placeholders in the
values.yamlfile with the environment-specific values. (Or you can use separatevalues-<env>.yamlfiles 🤮) - Deploy the Helm chart.
There is a Helm task but I found that it didn’t handle failures very well. If a deploy pipeline failed to deploy to K8s, you will get a timeout. To get better error handling, I wrote a PowerShell module, K8sUtils, that does a Helm install, then captures all the events and logs from the deploy and fails as soon as an error occurs. With the Helm task, even if the deploy failed immediately in K8s, it would wait until the timeout before returning. Using that module has made life much easier in my current situation.
stages:
- ${{ each env in parameters.environments }}: # create this stage for each environment
  - stage: deploy_${{ lower(env) }}           # stage names must be unique
    displayName: Deploy ${{ env }}

    variables:
      - name: appName
        value: sample-api
      - name: envLower
        value: ${{ lower(env) }}
      - name: imageTag  # substituted in values.yaml
        value: $(resources.pipeline.build_pipeline.runID)

      # Load the environment variables specific to this environment
      - template: variables/${{ variables.envLower }}-environment.yml

    jobs:
    - job: deploy_${{ variables.envLower }}           # job names must be unique
      displayName: Deploy ${{env }}
      pool:
        vmImage: ubuntu-latest

      steps:
      # - task: AzureKeyVault@2 # A task to get secrets for the K8s login step below

      # - task: Kubernetes@1    # To deploy with Helm, we need to connect to the cluster

      - task: qetza.replacetokens.replacetokens-task.replacetokens@5
        displayName: 'Replacing #{VAR}#. Will error on missing variables'
        inputs:
          targetFiles: ./DevOps/values.yaml => $(Agent.TempDirectory)/values.yaml
          actionOnMissing: fail

      - pwsh: |
          Get-Content $(Agent.TempDirectory)/values.yaml
        displayName: 'Show Helm Values'

      - pwsh: |
          if ($env:isDryRun -eq 'true') {
            Write-Host "This is a dry run. No deployment will be done."
          } else {
            Write-Host "Deploying to $env:environment"
          }
          Write-Host "This is a fake deployment step. Using K8sUtils and helm is a great way to deploy to Kubernetes"
        displayName: Deploy $(appName)
        env:
          isDryRun: $(isDryRun)
          environment: $(env)
This is where YAML really shines. Since each deployment is identical, I can re-use the YAML by using an ${{each}} loop. The parameters.environments is an array of environments to deploy to, which can be overridden for manually deploying to any environment. Inside the loop, the stage is replicated and the env variable will have the name of the current environment.
Since each environment may have different settings, I include different variables for each environment via the template keyword under stage.variables. (I’ll get more into templates in a later post.) In this case, I have a YAML file per environment, and using a naming convention (values-<env>.yaml) I can include the correct one for each environment. The variables in these files replace the placeholders in the values.yaml file avoiding duplicating nearly identical values.yaml files.
The replacement step uses a third-party task you can install in your AzDO organization. You may use another, or roll your own (like this). The ./DevOps/values.yaml => $(Agent.TempDirectory)/values.yaml syntax tells it not to overwrite the original file. I had a problem in one pipeline that did multiple deploys using the same values.yaml file. In that case, the second replacement step would do nothing since all the placeholders were already replaced so the second deploy used the first’s values.
The Show Helm Values step is a debugging aid. If we had problems in a deployment, by looking at the values file after the substitutions we could often spot it (usually a YAML indenting issue). Alternatively, you could save the file as a pipeline artifact.
Creating and Running the Pipelines
You should create your YAML on a feature branch and test it before merging it into the main branch. Chances are you will have to make several fixes to get a clean run (this is YAML after all) and you don’t want to be doing a bunch of PRs, etc. My process is as follows:
- Create the YAML on a feature branch.
- Commit and push the YAML.
- Create the build pipeline in AzDO UI. See this post for step-by-step instructions, including Validating the YAML.
- Create the deploy pipeline in AzDO UI. Remember its
resources.pipelines.pipeline.sourcemust match the name from the previous step. - Run the build pipeline. Fix, repeat, until green.
- Run the deploy pipeline. Fix, repeat, until green.
- Merge to your main branch!
The run pipeline isn’t too exciting since it just has one stage and one job. When you view any job in the UI you will see all the steps you have configured in the YAML.
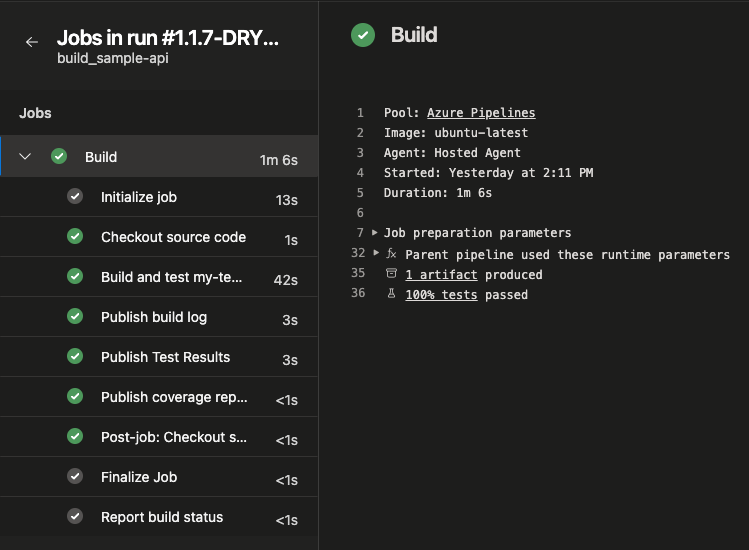
The displayName value is shown for each steps, which is why meaningful names are important. In addition to your steps, they will always be some pre- and post-steps that AzDO runs for you job.
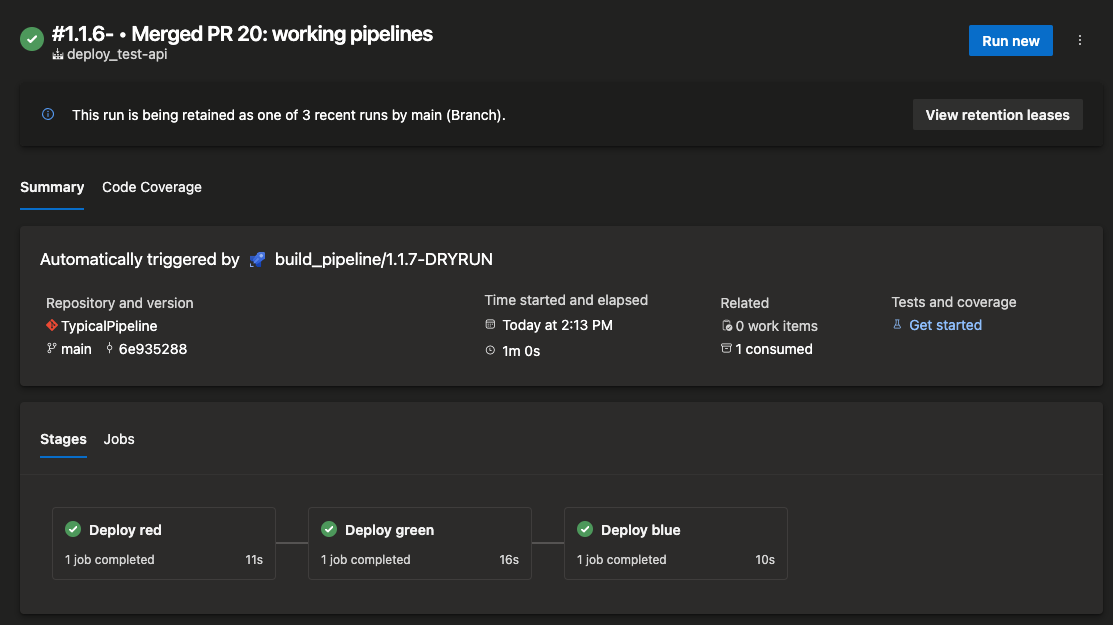
When the deploy pipeline runs you see each stage run in sequence.
If you manually run a pipeline, you can change the values of the parameters. Here’s the deploy pipeline’s parameters. I can edit the environments to deploy to any combination of red, green, and blue.
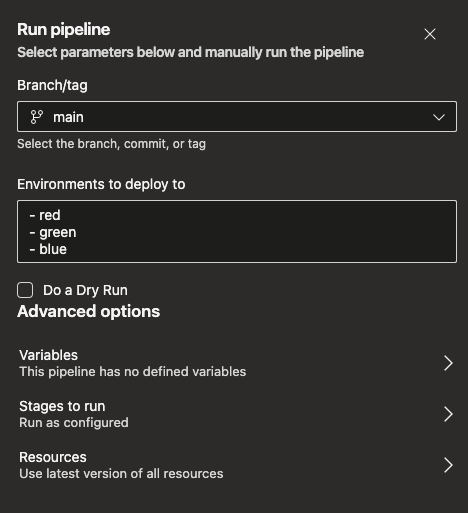
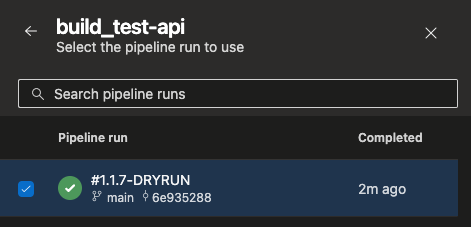
For manually running a deploy, you can select the specific build to deploy by clicking Resources from the image above. Since dry run builds are not pushed to the container registry, you can’t deploy them. Good thing I put -DRY RUN in the name!
There are some things to know when running the deploy pipeline.
- When manually running the deploy pipeline it will deploy the latest build by default. When triggered by the build pipeline it will use that build. For manual deploys, you may pick the build to deploy by clicking the
Resourcesbutton in the UI and selecting the build from the list. This is why I tack on-DRY RUNto dry run build names to make it obvious you don’t want that build. - There’s a bit of a trick to getting the deploy kicked off from the build pipeline. As of this writing, a pipeline must be committed to the default branch to trigger. Once the deploy pipeline is in your default branch it should trigger. Later you can edit and trigger from a branch. See the documentation for details.
Summary
I hope this will help you get started building your own YAML pipelines. This post has shown one way to get a basic build and deploy up and running as a one-off. In the next post, I’ll show how to take the build YAML and create reusable templates that you can leverage across many projects.
Links
- This sample’s source
- This sample’s Build pipeline in Azure DevOps
- This sample’s Deploy pipeline in Azure DevOps
- Running .NET Unit tests in Docker my post on how I run unit tests in Docker and get output.
Gists:
- Replace-It.ps1 - A PowerShell script to replace placeholders in a file with values from a file.
- run.ps1 - A PowerShell script to build, run, test, build docker, etc. locally.
Docker documentation:
Azure DevOps documentation: