
This is the fifth in a series of posts about creating reusable Azure DevOps YAML pipelines across many projects. In these posts, I’ll start with simple CI/CD pipelines and progress to a complex, dynamic pipeline.
- CI/CD YAML Pipelines
- Creating a Build Pipeline Template
- Creating a Deploy Pipeline Template
- Adding “feature flags” to a pipeline
- Dynamic CI/CD Pipeline (this post)
- Azure DevOps Pipeline Tips and Tricks
This post assumes you are familiar with Azure DevOps concepts and YAML pipelines. If you need a refresher, check out my first post in this series.
The Problem
This is a true story. The events depicted took place in Azure DevOps in 2024. At the request of the survivors, the names have been changed. Out of respect for the crashes, the rest has been told exactly as it occurred.
From management:
We are outsourcing work overseas and need to standardize on branching, builds, and deployments for our 100+ deployables.
That sounded pretty scary, but we already had most of our CI/CD pipelines in Azure DevOps as YAML and had a bunch of YAML templates in a shared repo. As a DevOps developer, that sounded tedious, but not complex – probably a matter of writing a few scripts. Then the other shoe dropped.
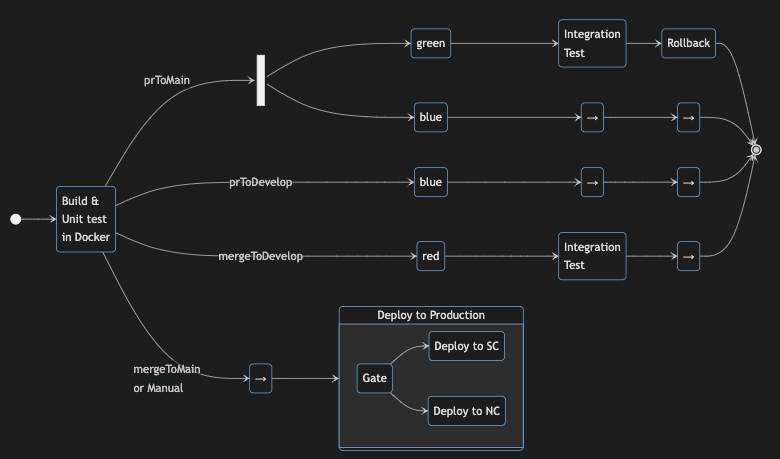
After the build, we want the following to happen:
- For a PR to
main, deploy to the blue environment. And deploy to green, run integration tests, then rollback the deployment- For a PR to
develop, deploy to the blue environment for any manual testing- For a push or merge to
develop, deploy to the red environment and run integration tests- For the merge into
main, kick off a gated deployment pipeline to production
And that is a simplification. There were actually seven different scenarios and four environments. Do not ask me about why it was that way.
Translating that into a diagram:
stateDiagram
    direction LR

    state "Build &\nUnit test\nin Docker" as b
    state fork <<fork>>

    state "→" as i1
    state "→" as i2
    state "Integration\nTest" as i21
    state "Integration\nTest" as i4

    state "→" as r1
    state "→" as r2
    state "Rollback" as r21
    state "→" as r4

    state "blue" as d1
    state "blue" as d2

    state "red" as nd
    state "green" as t
    state "→" as e2


    [*] --> b

    b --> fork : prToMain
    fork --> d2
    fork --> t
    t --> i21
    i21 --> r21
    r21 --> [*]
    d2 --> i2
    i2 --> r2
    r2 --> [*]

    b --> d1 : prToDevelop
    d1 --> i1
    i1 --> r1
    r1 --> [*]

    b --> nd : mergeToDevelop
    nd --> i4
    i4 --> r4
    r4 --> [*]

    state "Deploy to Production" as pp
    b --> e2 : mergeToMain\nor Manual
    e2 --> pp

state pp {
    direction LR
    state "Gate" as g
    g --> x
    g --> y
    state "Deploy to SC" as x
    state "Deploy to NC" as y
}
NOTE: Each box with text represents a
stagein the pipeline. The names on the lines are scenario names, which I will use throughout this post.
And given all that, we knew it was not the final word. There would be changes (and there were). One of the first things we did was to standardize the branching and pipelines.
As I started designing the pipeline, I found that the tricky part would be the conditional branching after the build stage. When adding conditions to pipelines in the past, I have used the template syntax such as ${{if}}. That works if you have the values for the condition at compile-time, but in this case, I do not know everything at compile-time. In addition, any given app may opt out of the integration test stage. Given those requirements, the pipeline must dynamically determine the path it will take at runtime. That is the topic of this post.
The Solution
Instead of the template syntax, I can use a condition, which is evaluated at runtime. By setting variables in the initial (build) stage of the pipeline, I can use them in conditions on the downstream stages and jobs to determine which path to take.
High-Level Pipeline
For standardization, I created a high-level template that all the apps would use and then use feature flags (see this post) to enable or disable parts of the pipeline. Below are the stages for that template. Normally, five stages like this would create a line, but I’ll tweak the dependsOn below to branch off the secondary deploy.
stages:

  # All scenarios need build
  - template: ./dynamic-build.yml
    parameters:
      devOpsFolder: ${{ parameters.devOpsFolder }}
      isDryRun: ${{ parameters.isDryRun }}
      scenarioOverride: ${{ parameters.scenarioOverride }}

  # prToMain, prToDevelop, and mergeToDevelop deploy to primary environment
  - template: ./dynamic-deploy.yml
    parameters:
      devOpsFolder: ${{ parameters.devOpsFolder }}
      isDryRun: ${{ parameters.isDryRun }}
      environmentVariableName: primaryEnvironment

  # prToMain deploys to secondary environment
  - template: ./dynamic-deploy.yml
    parameters:
      devOpsFolder: ${{ parameters.devOpsFolder }}
      isDryRun: ${{ parameters.isDryRun }}
      environmentVariableName: secondaryEnvironment

  # prToMain and mergeToDevelop run integration tests
  - template: ./dynamic-integration-test.yml
    parameters:
      devOpsFolder: ${{ parameters.devOpsFolder }}
      isDryRun: ${{ parameters.isDryRun }}

  # prToMain has rollback
  - template: ./dynamic-rollback.yml
    parameters:
      devOpsFolder: ${{ parameters.devOpsFolder }}
      isDryRun: ${{ parameters.isDryRun }}
Build Stage
The first stage in the pipeline is the build stage that uses the template from this post. After the build, I added a step to determine the pipeline’s path.
These are the inputs that I need to set the path:
| Input | From | Known at compile-time |
|---|---|---|
| sourceBranch | Build.SourceBranch | Yes |
| prSourceBranch | System.PullRequest.SourceBranch | No |
| prTargetBranch | System.PullRequest.TargetBranchName | No |
| isPr | System.PullRequest.PullRequestNumber | No |
| manualBuild | Build.Reason == ‘Manual’ | Yes |
The needed
System.PullRequest.*variables are not available at compile-time. The documentation for them has a column,Available in templates, to show which ones are available at compile-time, but that column may not show up depending on the width of your browser window. You can use theExpand tablebutton to see it.In the real story, I needed to know if it was a draft PR, which is not available as a variable. To get that I had to make a REST call to get the PR details with the draft status.
Since I can’t use template syntax (${{if}}) to conditionally create the path at compile-time, the pipeline will be created with all the stages and all the jobs. At run-time it will skip the ones that don’t apply to the current scenario.
The added step is a PowerShell script that gets all the input values to determine which scenario this is. Then it sets variables in the pipeline that are used in downstream stage and job YAML. The output variables are:
| Variable Name | Description |
|---|---|
| scenario | Friendly name of the scenario |
| primaryEnvironment | Primary environment to deploy to |
| secondaryEnvironment | Secondary environment to deploy to (only used in prToMain) |
| environments | List of environments to deploy to |
| runIntegration | Whether to run integration test stage |
| rollback | Whether to run the rollback stage |
Here’s the relevant part the steps/set-pipeline-scenario.yml. It’s pretty much a big switch statement to figure out what variables need to be set for the downstream stages.
if ($manualBuild -and $env:scenarioOverride -eq 'none') {
  # no deploys, but pipeline needs an environment, we'll just use blue
  $environments = 'blue'
  $scenario = 'manualBuild'

# PR to main
} elseif ($isPr -and $prTargetBranch -eq 'main'
              -or $env:scenarioOverride -eq 'prToMain') {
  $scenario = 'prToMain'
  $primaryEnvironment = 'green'
  $secondaryEnvironment = 'blue'
  $environments = 'green,blue'
  $runIntegration = 'True'
  $rollback = 'True'

# PR created against `develop`
} elseif ($isPr -and $prTargetBranch -eq 'develop'
             -or $env:scenarioOverride -eq 'prToDevelop') {
  $scenario = 'prToDevelop'
  $primaryEnvironment = 'blue'
  $environments = 'blue'

# PR merged/push into `develop`
} elseif (!$isPr -and $sourceBranch -eq 'refs/heads/develop'
             -or $env:scenarioOverride -eq 'mergeToDevelop') {
  $scenario = 'mergeToDevelop'
  $primaryEnvironment = 'red'
  $environments = 'red'
  $runIntegration = 'True'

# PR merged to `main`
} elseif (!$isPr -and $sourceBranch -eq 'refs/heads/main'
              -or $env:scenarioOverride -eq 'mergeToMain') {
  # no deployments, since deploy pipeline will take care of it
  $scenario = 'mergeToMain'
  $environments = 'blue,green,red,prod' # no deploys, eventually all these will go

} else {
  $scenario = 'fellThrough!'
  $environments = 'blue'
  "##vso[task.logissue type=warning]When setting build variables no conditions met. Check its output."
}

"##vso[task.setvariable variable=scenario;isOutput=true]$scenario"
"##vso[task.setvariable variable=environments;isOutput=true]$environments"
"##vso[task.setvariable variable=primaryEnvironment;isOutput=true]$primaryEnvironment"
"##vso[task.setvariable variable=rollback;isOutput=true]$rollback"
"##vso[task.setvariable variable=runIntegration;isOutput=true]$runIntegration"
"##vso[task.setvariable variable=secondaryEnvironment;isOutput=true]$secondaryEnvironment"
The last few lines above are the important part. The setvariable commands tell AzDO to set those variables in the pipeline. isOutput=true tells AzDO that the variable will be available outside of the current job.
💁 Brief Lesson on Pipeline Variable Access
The documentation is pretty good, but their implementation can be a bit confusing.
For example, if I use
##vso[task.setvariable variable=scenario;isOutput=true|false]$scenarioinbuildStepstep inbuildJobjob inbuildStagestage.If
isOutputis false you can only access it only from the current job using the macro syntax, or env variables.
$(scenario)$scenariobash$env:scenarioPowerShellIf
isOutputis true you can access it from anywhere in the pipeline
- same job:
$(buildStep.deployName)👈 sinceisOutput=true, syntax is different in same context- another job:
dependencies.buildJob.outputs['buildStep.deployName']- another stage:
stageDependencies.buildJob.outputs['buildJob.buildStep.deployName']- another job in another stage:
stageDependencies.buildStage.buildJob.outputs['buildStep.deployName']To be able to access output from another
joborstage, it must be in thedependsOnsection, which I’ll show below.
Conditional Stages
After the build stage are: the deploy, integration test, and rollback stages, each of which will depend on the build stage to access the variables it sets. Here’s the deploy stage’s dependsOn section.
stages:
  - stage: deploy_${{ lower(parameters.environmentVariableName) }}
    displayName: Deploy ${{ parameters.environmentVariableName }}
    dependsOn: [buildStage] # 👈 this puts the deploy after the build in the graph
                            # 👈 _and_ gets access to its variables
By default (without dependsOn), stages depend on their previous stage. Since there are two possible deployments, primary and secondary, both will depend on the build stage as shown below.
Since the same YAML is used for both deploys, an environmentVariableName variable is passed in from the calling template as primaryEnvironment or secondaryEnvironment, which are the names of variables set by the scenario script. For example, the stage name will be deploy_primaryenvironment or deploy_secondaryenvironment at compile-time.
As I mentioned at the beginning of this post, I will use condition to skip stages that are not needed. Here’s the deploy stage’s condition. (The default condition is succeeded() if it is not supplied.)
condition: |
  and (
    succeeded(),
    # 👇 e.g. primaryEnvironment != ''
    gt(length(stageDependencies.buildStage.outputs['buildJob.set_pipeline_scenario.${{parameters.environmentVariableName}}']),0)
  )
That needs some explanation. To reuse the deploy pipeline for multiple environments, the environmentVariableName is passed in from the calling template (above) as primaryEnvironment or secondaryEnvironment. For the former, the compiled YAML will look like this (line breaks for readability):
and (
  succeeded(),
  stageDependencies
    .buildStage
    .outputs['buildJob.set_pipeline_scenario.primaryEnvironment']
  )
)
Which is a long-winded way of saying, “Did the build succeed and is the primaryEnvironment scenario variable not empty?” (Empty is falsey in YAML.)
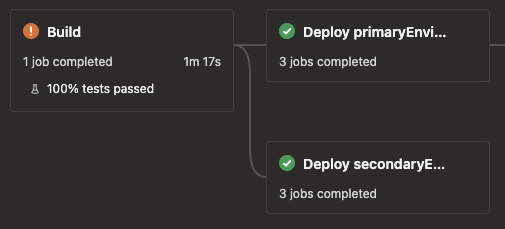
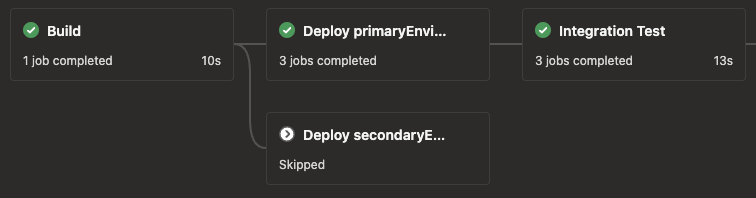
primaryEnvironment or secondaryEnvironment will be empty for the mergeToMain scenario, and secondaryEnvironment will only have a value for the prToMain scenario. The previous image was prToMain so both ran. Below is a prToDevelop scenario, and only the primary ran.

The integration test is similar. It needs to depend on the primary deploy and the build stages so it can access the variables for the condition
stages:
  - stage: integration_test
    displayName: Integration Test
    dependsOn: [deploy_primaryenvironment,buildStage]
    condition: |
      and(
        succeeded(),
        # 👇 primaryEnvironment != ''
        stageDependencies.buildStage.outputs['buildJob.set_pipeline_scenario.primaryEnvironment'],
        # 👇 runIntegration == 'True'
        eq(stageDependencies.buildStage.outputs['buildJob.set_pipeline_scenario.runIntegration'],'True')
      )
When there are multiple values in the dependsOn, the first one determines the order of the stages in the graph. In this case, the integration will come after the primary deploy. The condition for this stage is the same as the deploy with the addition of checking the runIntegration value set by the scenario script. Here’s the integration test stage in action.
The rollback stage is slightly different. It will run even if the integration_test (its dependent) stage fails. I do that by not using succeeded(), but instead checking that the deploy stage succeeded. If the deploy failed, there is no need to run the rollback.
stages:
  - stage: rollback
    displayName: Rollback
    dependsOn: [integration_test,buildStage,deploy_primaryenvironment]
    condition: |
      and(
        # 👇 primaryEnvironment != ''
        stageDependencies.buildStage.outputs['buildJob.set_pipeline_scenario.primaryEnvironment'],
        # 👇 rollback == 'True'
        eq(stageDependencies.buildStage.outputs['buildJob.set_pipeline_scenario.rollback'],'True'),
        # 👇 deploy succeeded
        eq(dependencies.deploy_primaryenvironment.result, 'Succeeded')
      )
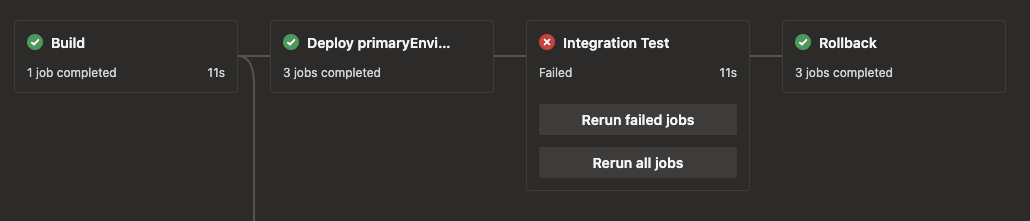
Here’s a pipeline that ran with a failing integration test, but the rollback still ran.
That covers the stages being run or skipped based on run-time variables. Next, I’ll cover the jobs.
Conditional Jobs
Since I don’t know which environments need to run the deploy, integration test, or rollback, the stage must have a job for each one at compile-time. Even though the YAML is the same for the jobs, the variables for each are environment-specific. Since the variables are loaded at compile-time, I must have separate jobs.
Each stage’s jobs are very similar, I will use the rollback stage as the example.
jobs:
  - ${{ each env in split('red,blue,green', ',')}}:
    - job: rollback_${{ lower(env) }}
      displayName: Rollback ${{ env }}
I use the ${{each}} syntax to loop over the environment list to create three jobs. Of course, I only want to run one of them at runtime, so I use a condition for that.
condition: |
  and (
    succeeded(),
    # 👇 primaryEnvironment == $env
    eq(stageDependencies
        .buildStage
        .buildJob
        .outputs['set_pipeline_scenario.primaryEnvironment'], '${{env}}')
  )
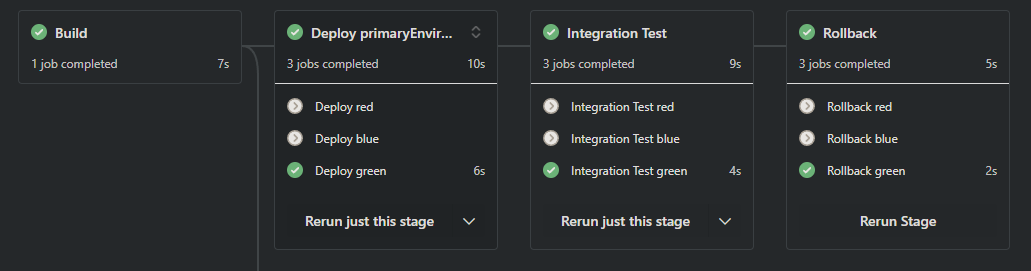
As with the stage’s condition, I check the variable that the build stage set. Instead of just checking if it’s empty, I check to see if it matches the value for this job’s env value from the ${{each}} loop. For each stage, there will be a red, blue, and green job, and the primaryEnvironment value will only match one so only one job runs. When viewing the pipelines’ jobs, only one environment ran in each stage, and it is the same for all stages. In the screenshot below, which was a prToMain scenario, the green job ran for each stage.
In a mergeToDevelop scenario, only the blue job ran, and the rollback stage was skipped.

Summary
This was by far the most complicated pipeline I have ever created. It has served me well in my current position, as well as all of the templates. If you ever have a situation like this I hope this post and the sample code will save you some time.
If you view the sample code, you’ll see a scenarioOverride parameter that can be set for manual builds. This is very useful for testing all the scenarios to make sure they run the correct stages and jobs. You may want to remove it when you are finished or leave it for future use. In the actual template I created, I left it in the template so it could be used, but the caller had to explicitly expose the parameter in their pipeline to make it visible. Once things work, you’ll want to create PRs, pushes, etc. to test all the cases for real. Logging out the input and outputs of the scenario script is very helpful for debugging (not shown above, but in the YAML).
Build and deploys can take a long time. To shake out the conditional part of the pipeline, I recommend stubbing out the build and deploy until the pipeline is working correctly as I did for this sample.
Good luck, and watch your indenting!
Links
- This sample’s source The DevOps files are in the DevOps-dynamic folder.
- This sample’s Build pipeline in Azure DevOps
- The template repo
Azure DevOps documentation:
- Sharing Variables in a pipeline
- SetVariable Logging Command to set a variable in a step for use in another step or stage.
- Conditions
- Functions for use in expressions.
and,or,contains, etc. - Predefined Build Variables
- Predefined System Variables
- Set an output variable for use in future stages